CBX Converts
'82 Front End onto a '79 by Jim Potter

CBX VFR by Pete Ruff

GSXR-VFR'ing a CBX by Stephen MacLean
'82 Front End onto a '79 by Jim Potter
The 82 front end will bolt right up to a 79 frame. I used everything from
the 82 front end including the triple tree. The 81/82 front end also houses
the fuses which is identical to the 79's as the wiring wasn't changed.
There are a few differences on the later model front ends as follows:
1. Large diameter forks tubes (A big plus)
2. The forks are a little wider (about .5") which means you need to put
some washers in as spacers between the front fender and the forks where
they bolt together.
3. The 81/82 forks also allow you to pressurize them with compressed air.
They have a equalization tube running between the two forks which needs to
be routed under the instrument cluster for a clean look.
OK - Regarding the euro bars - They are identical to the sport kit bars
which were made for the 79' but they have a larger dia. bore to accommodate
the larger dia. fork tubes. I had to sleeve them with aluminum for a tight
fit (not sure why this was designed that way?). I did acquire a sport kit
throttle and cables from davidsilverspares.com. I have seen the sport bars
with the stock throttle cables - probably because the electrics are in short
supply. (I got the last sport kit throttle form davidsilverspares by the way.)
 When the forks are changed, it is best to also change the brakes as well.
While it may be possible to install 79' brakes/rotors on an 81/82 front end,
the cleanest upgrade is to find a set of rotors and brakes from an 81/82 and
bolt them up to the forks/wheel ( A 79' wheel can be used with an 81 or 82
front end but you must use a '81/'82 axle and spacers). The brakes are dual
piston instead of single and work very well. The rear rotor on all years
of the CBX was a single disk so the rotor in the rear does not need to be
changed if you want to upgrade the rear brakes to dual piston. I got my
brakes/rotors on ebay for about $150 so it is not too expensive. I rebuilt
all the calipers/master cylinders which I would suggest prior to installation
as we all need to remember that these systems are 20 years old.
When the forks are changed, it is best to also change the brakes as well.
While it may be possible to install 79' brakes/rotors on an 81/82 front end,
the cleanest upgrade is to find a set of rotors and brakes from an 81/82 and
bolt them up to the forks/wheel ( A 79' wheel can be used with an 81 or 82
front end but you must use a '81/'82 axle and spacers). The brakes are dual
piston instead of single and work very well. The rear rotor on all years
of the CBX was a single disk so the rotor in the rear does not need to be
changed if you want to upgrade the rear brakes to dual piston. I got my
brakes/rotors on ebay for about $150 so it is not too expensive. I rebuilt
all the calipers/master cylinders which I would suggest prior to installation
as we all need to remember that these systems are 20 years old.
 What I like about these upgrades is that you get the best of both worlds,
in my mind. The 79 Sport CBX with an upgraded front end and brakes. If
the Super Sport model was made in 81 and 82, it would have had these upgrades
as the front end was, in my mind the only weakness on the early bikes. The
bike basically still looks stock which is also a plus in my mind. I recently
took this bike to the Del Mar Concours De Elegance where the bike won an award.
Even the judges were not aware of the changes that I had made.
Take Care.........Jim Potter
What I like about these upgrades is that you get the best of both worlds,
in my mind. The 79 Sport CBX with an upgraded front end and brakes. If
the Super Sport model was made in 81 and 82, it would have had these upgrades
as the front end was, in my mind the only weakness on the early bikes. The
bike basically still looks stock which is also a plus in my mind. I recently
took this bike to the Del Mar Concours De Elegance where the bike won an award.
Even the judges were not aware of the changes that I had made.
Take Care.........Jim Potter
CBX VFR by Pete Ruff
Putting the swingarm on the CBX was pretty easy, all things considered. I
used an '81 frame, but I think I would use an 80 next time. I don't think
a 79 frame would be so easy, because does not have the "adjuster nuts" on
the frame through which the swingarm pivot passes.
The swingarm pretty much fits into the frame, but the VFR uses a pivot bolt
2mm larger than the CBX, so you have to machine spacers to allow the
swingarm to ride on the CBX pivot bolt (the 79 swingarm pivot bolt is
another 2mm smaller - another reason to stay away from the 79).
The battery box and air box must be moved, because the shock goes right up
through where they are. DynoJet pod filters take care of the air box. You
have to move the battery back some, and will have to use a smaller battery
because it fits in from the top of the frame - that means it must be able
to pass between the frame rails in the seat area. The battery in the photo
is a full size 20ah CBX battery. I have to remove the rear wheel to get it
in and out, that's why I say a smaller battery is necessary - although
removing the rear wheel is a piece of cake, four lug nuts and it's off!
 You have to fab the lower shock linkage mounting points on the frame, and a
mount for the top of the shock. Any good welder can do that. I used most
of the VFR lower shock linkage, but shortened. I used the VFR shock, but
the spring is probably a little too stiff. The CBX shock will not fit in
the hole in the VFR swingarm, so you have to toss it (the CBX shock).
Be sure to carefully determine the ride height, so the top shock mount is
located properly. The VFR wheel is a lot shorter than the CBX, so you have
to make allowances for that so you have enough ground clearance. Cornering
clearance is not a problem. I used the VFR fork in the Pro-Link triple
clamps - they were bored out to 41mm.
You have to fab the lower shock linkage mounting points on the frame, and a
mount for the top of the shock. Any good welder can do that. I used most
of the VFR lower shock linkage, but shortened. I used the VFR shock, but
the spring is probably a little too stiff. The CBX shock will not fit in
the hole in the VFR swingarm, so you have to toss it (the CBX shock).
Be sure to carefully determine the ride height, so the top shock mount is
located properly. The VFR wheel is a lot shorter than the CBX, so you have
to make allowances for that so you have enough ground clearance. Cornering
clearance is not a problem. I used the VFR fork in the Pro-Link triple
clamps - they were bored out to 41mm.
 By flipping the C/S sprocket over, so the boss in towards the case, the
chain lines up perfectly. I use a 114 link 530 chain.
The VFR brakes, although similar in design to the CBX brakes are waaaaay
better :).
The ride and handling are fine, about like any CBX, though it steers a
little slower because the wheelbase is longer, I think the VFR swingarm is
1 5/8 inch longer than the Pro-Link swingarm.
My donor VFR was a 90 model. I think in 94 Honda made a lot of changes to
the VFR - I am not sure if these later VFR swingarms are the same. They
look to be, so I imagine they would work just about the same as the one I
used.
By flipping the C/S sprocket over, so the boss in towards the case, the
chain lines up perfectly. I use a 114 link 530 chain.
The VFR brakes, although similar in design to the CBX brakes are waaaaay
better :).
The ride and handling are fine, about like any CBX, though it steers a
little slower because the wheelbase is longer, I think the VFR swingarm is
1 5/8 inch longer than the Pro-Link swingarm.
My donor VFR was a 90 model. I think in 94 Honda made a lot of changes to
the VFR - I am not sure if these later VFR swingarms are the same. They
look to be, so I imagine they would work just about the same as the one I
used.
 Would I do it again? I haven't completely finished this bike, so I am not
about to try it again, but... It is a unique CBX, one that certainly draws
the Ohhhhs and Ahhhhhs, so I probably would. I need to get back on it and
finish the details like the rear turn signals, raise it a little, paint the
body, and ideally, strip and polish the wheels.
Pete Ruff
Would I do it again? I haven't completely finished this bike, so I am not
about to try it again, but... It is a unique CBX, one that certainly draws
the Ohhhhs and Ahhhhhs, so I probably would. I need to get back on it and
finish the details like the rear turn signals, raise it a little, paint the
body, and ideally, strip and polish the wheels.
Pete Ruff
GSXR-VFR'ing a CBX by Stephen MacLean
This journey started in October, 1999, when I acquired a
1981 CBX -it was bone stock.
 This article describes some of the plethora of modifications I have made to
the bike, including a GSXR-1100 front end, VFR single sided swingarm and a
modified, perimeter frame. Within a few days I had the bits off and had
started welding the perimeter tubes on the frame :
Perimeter frame :
I measured out equal lengths of square tubing and welded them onto the steering
head tubes as shown below. I then bent the tubes around the frame to a marker
point and welded on the first truss tube.
This article describes some of the plethora of modifications I have made to
the bike, including a GSXR-1100 front end, VFR single sided swingarm and a
modified, perimeter frame. Within a few days I had the bits off and had
started welding the perimeter tubes on the frame :
Perimeter frame :
I measured out equal lengths of square tubing and welded them onto the steering
head tubes as shown below. I then bent the tubes around the frame to a marker
point and welded on the first truss tube.
 I then measured out equal lengths of round tubing and welded them onto the square tubes
and added the second truss as shown. I then bent the tubes (a fairly complex process)
and welded them onto the lower frame near the shock absorber mount truss.
I then measured out equal lengths of round tubing and welded them onto the square tubes
and added the second truss as shown. I then bent the tubes (a fairly complex process)
and welded them onto the lower frame near the shock absorber mount truss.
 This, of course, was just the beginning, as there was much welding, fitting and
smoothing to be done. You can see the stiffening truss in the middle of each new
side tube. One downside of this is that I had to relocate the petcock in the
tank - it's easier to use at the back of the tank anyway.
The upper shock mounting brace had to be moved upwards to accommodate the VFR
swingarm and shock. The bell crank pivot mount was welded onto the existing
centre stand brackets and braced with tubing. The sidestand was relocated to
the outside of the frame and welded on there + stiffened by a bar through the frame.
This, of course, was just the beginning, as there was much welding, fitting and
smoothing to be done. You can see the stiffening truss in the middle of each new
side tube. One downside of this is that I had to relocate the petcock in the
tank - it's easier to use at the back of the tank anyway.
The upper shock mounting brace had to be moved upwards to accommodate the VFR
swingarm and shock. The bell crank pivot mount was welded onto the existing
centre stand brackets and braced with tubing. The sidestand was relocated to
the outside of the frame and welded on there + stiffened by a bar through the frame.

 Bracing trusses were then added to the upper shock bracing shown below :
 The idea of the perimeter frame is to increase the stiffness of the frame by increasing
its moment of inertia. I elected to use braze welding in order to minimise the stress on
the frame. Below is the completed result after painting and clear coat :
The idea of the perimeter frame is to increase the stiffness of the frame by increasing
its moment of inertia. I elected to use braze welding in order to minimise the stress on
the frame. Below is the completed result after painting and clear coat :
 Front end :
I selected the GSXR 1100 inverted forks for my front end - I really like the looks of
those massive 52mm inverted forks, not to mention that they work really well too! Also
included in the package are the 6-pot Tokico brakes and 320 mm rotors.
Some vital information from a planning standpoint :
* The bottom bearing for the GSXR 1100 (95, in my case) and the CBX are identical.
* The upper bearing O.D is the same, but the I..D. is smaller on the GSXR.
* Also, the GSXR stem is too short and the lower clamp on the CBX is much thicker.
There are two things you have to do to start :
* Press the stem out of the CBX tree and install it in the lower clamp of the GSXR -
this is the only thing I outsourced. BEFORE you install the lower bearing (press fit
on the stem), fabricate and install at 0.25 to 0.300 inch space BELOW the bearing,
otherwise, the upper bearing will sit proud of the upper race - not good! Measure your
specific machine, as your mileage may vary! :-) I found this one out by trial
and ignorance.
* Since the upper stem of the CBX tree is 1 mm bigger than that of the GSXR, you will
need to bore out the hole in the upper clamp to mount the clamp.
* I made up a couple of brackets to locate the CBX ignition key, one of which I pressed
into the existing hole in the GSXR upper clamp and then drilled it off centre to
locate the CBX ignition. Otherwise, the ignition won't go on - it collided with the
frame around the steering stem.
* Having done that, you need to make a small bracket to bolt into the existing ignition
mounting holes on the lower side of the upper clamp with a second set of holes further
out to take the CBX ignition.
Here's a picture of the top triple clamp & the ignition key bracket :
Front end :
I selected the GSXR 1100 inverted forks for my front end - I really like the looks of
those massive 52mm inverted forks, not to mention that they work really well too! Also
included in the package are the 6-pot Tokico brakes and 320 mm rotors.
Some vital information from a planning standpoint :
* The bottom bearing for the GSXR 1100 (95, in my case) and the CBX are identical.
* The upper bearing O.D is the same, but the I..D. is smaller on the GSXR.
* Also, the GSXR stem is too short and the lower clamp on the CBX is much thicker.
There are two things you have to do to start :
* Press the stem out of the CBX tree and install it in the lower clamp of the GSXR -
this is the only thing I outsourced. BEFORE you install the lower bearing (press fit
on the stem), fabricate and install at 0.25 to 0.300 inch space BELOW the bearing,
otherwise, the upper bearing will sit proud of the upper race - not good! Measure your
specific machine, as your mileage may vary! :-) I found this one out by trial
and ignorance.
* Since the upper stem of the CBX tree is 1 mm bigger than that of the GSXR, you will
need to bore out the hole in the upper clamp to mount the clamp.
* I made up a couple of brackets to locate the CBX ignition key, one of which I pressed
into the existing hole in the GSXR upper clamp and then drilled it off centre to
locate the CBX ignition. Otherwise, the ignition won't go on - it collided with the
frame around the steering stem.
* Having done that, you need to make a small bracket to bolt into the existing ignition
mounting holes on the lower side of the upper clamp with a second set of holes further
out to take the CBX ignition.
Here's a picture of the top triple clamp & the ignition key bracket :
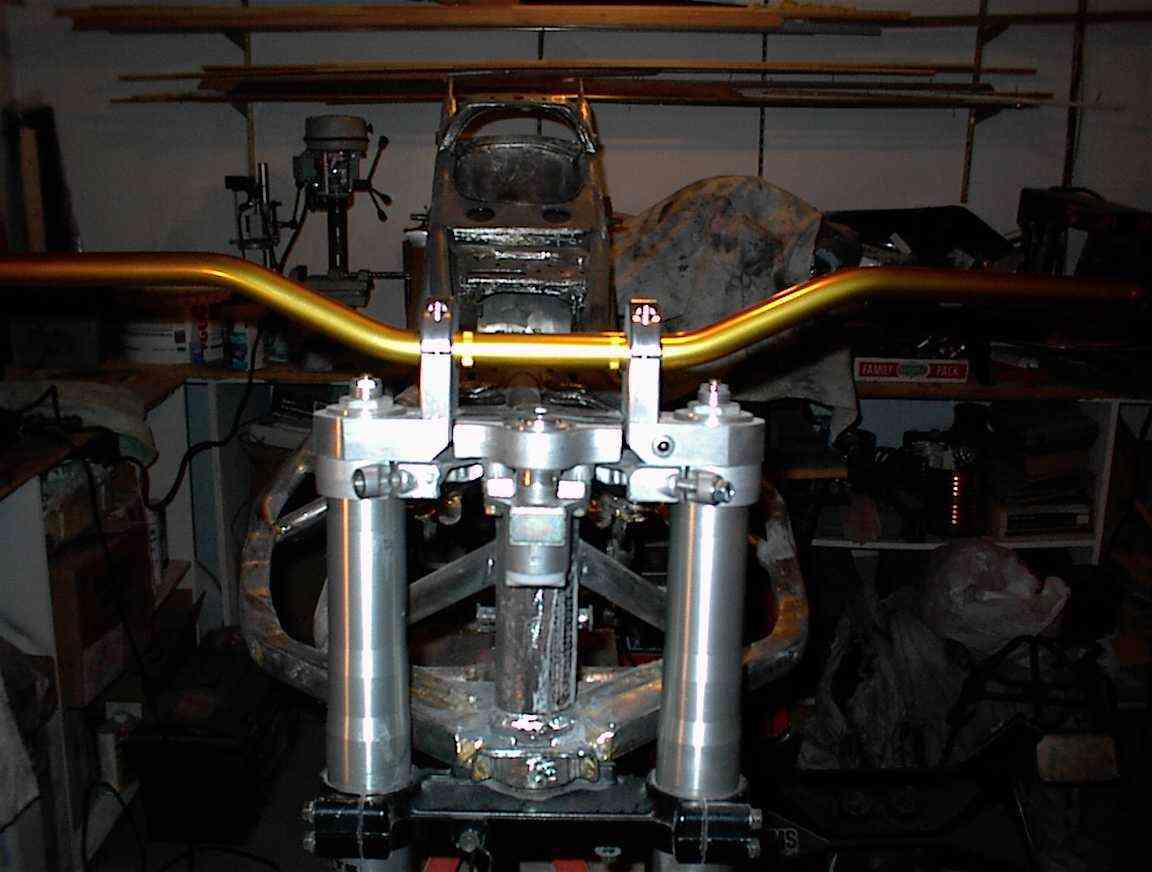
 * Because the GSXR forks are shorter than the stock CBX clamps, I made up a dropped
triple clamp to retain some ground clearance. This was further necessitated by the
clip-on handle bar clamps that M&P (UK) sell. They clamp on the upper fork legs and
provide a clamp for the bars. These clip-on clamps are somewhat expensive though, about
� 60 ($ 120 US or so). I have also installed a set of gold Renthal Superbike bars.
* Because the GSXR forks are shorter than the stock CBX clamps, I made up a dropped
triple clamp to retain some ground clearance. This was further necessitated by the
clip-on handle bar clamps that M&P (UK) sell. They clamp on the upper fork legs and
provide a clamp for the bars. These clip-on clamps are somewhat expensive though, about
� 60 ($ 120 US or so). I have also installed a set of gold Renthal Superbike bars.
 * As I said, the CBX stem is somewhat shorter than the GSXR one, necessitating
milling the scallop cut shown below to allow the nut to be attached and done up.
* As I said, the CBX stem is somewhat shorter than the GSXR one, necessitating
milling the scallop cut shown below to allow the nut to be attached and done up.
 * The fork stops should be Ok with a stock frame. I had to weld mine up, because of
the perimeter frame bracing around the triple tree.
VFR Swing Arm :
I really love the looks of a single sided swingarm, as well as the convenience of easy
wheel changes and having no alignment issues to worry about. Yes, it's probably a
little heavier and it's actually somewhat longer than the stock CBX swingarm, resulting
in a slightly longer wheelbase than stock (about 1.5"). I didn't realise this at the
beginning, however, with the smaller 17" rims and the shorter GSXR forks, it's
probably about the same wheelbase as stock, if not slightly shorter.
* You need to cut out the top fork brace on your CBX frame. I cut both tubes from the
frame, but left the shock mount welded to both.
* You need to take the swing arm pivots (they unscrew from the frame and one has a
collar to adjust the position of the swingarm, left to right) and machine them out
(on a lathe) from 16 to 20 mm as the VFR swingarm pivot bolt is 4mm bigger. The VFR
swingarm pivot is also much shorter, so you will have to devise a revised peg/lever
mounting - I am making my own rearsets anyway. I used the stock VFR swingarm pivot,
which is a very nice piece, but had to machine the collar of the unthreaded end back as
far as I could to get more thread out the other end. I also made up my own aluminum
washers to cover up the big gaps around the stock pivot adjusters.
* The fork stops should be Ok with a stock frame. I had to weld mine up, because of
the perimeter frame bracing around the triple tree.
VFR Swing Arm :
I really love the looks of a single sided swingarm, as well as the convenience of easy
wheel changes and having no alignment issues to worry about. Yes, it's probably a
little heavier and it's actually somewhat longer than the stock CBX swingarm, resulting
in a slightly longer wheelbase than stock (about 1.5"). I didn't realise this at the
beginning, however, with the smaller 17" rims and the shorter GSXR forks, it's
probably about the same wheelbase as stock, if not slightly shorter.
* You need to cut out the top fork brace on your CBX frame. I cut both tubes from the
frame, but left the shock mount welded to both.
* You need to take the swing arm pivots (they unscrew from the frame and one has a
collar to adjust the position of the swingarm, left to right) and machine them out
(on a lathe) from 16 to 20 mm as the VFR swingarm pivot bolt is 4mm bigger. The VFR
swingarm pivot is also much shorter, so you will have to devise a revised peg/lever
mounting - I am making my own rearsets anyway. I used the stock VFR swingarm pivot,
which is a very nice piece, but had to machine the collar of the unthreaded end back as
far as I could to get more thread out the other end. I also made up my own aluminum
washers to cover up the big gaps around the stock pivot adjusters.
 * Re-install the swingarm pivots in the frame, with the engine installed and install
the swingarm. Lay the chain over the front and rear sprockets and line it up. Visual
is OK at this point, as you still have the swingarm pivot collar and spacers to play
with the left right position of the swingarm.
* Install the shock on the lower pivot of the swingarm and position the upper
pivot bars (attached to the top shock mount) with the cut off cross brace installed.
* Locate two side beams on each side of the frame (approx. 2" above the existing ones)
and weld them in - one on each side.
* With the chain still aligned, locate the cross brace with the shock placed in it's
normal operating position - align the shock in the centre of the hole in the middle
of the swingarm and tack on the cross brace. This is to ensure that the shock will not
bind in the hole in the swing arm.
* Now comes the really exciting part! Invert the frame, with everything still
attached (BTW - take the engine out first!!! :-) ) and locate the lower pivot for the
shock linkage. If your bike is like mine, I cut off the existing shock linkage pivots,
ground down the frame and used the centre stand pivot as the pivot location. I was
planning on removing the centre stand anyway.
* Re-install the swingarm pivots in the frame, with the engine installed and install
the swingarm. Lay the chain over the front and rear sprockets and line it up. Visual
is OK at this point, as you still have the swingarm pivot collar and spacers to play
with the left right position of the swingarm.
* Install the shock on the lower pivot of the swingarm and position the upper
pivot bars (attached to the top shock mount) with the cut off cross brace installed.
* Locate two side beams on each side of the frame (approx. 2" above the existing ones)
and weld them in - one on each side.
* With the chain still aligned, locate the cross brace with the shock placed in it's
normal operating position - align the shock in the centre of the hole in the middle
of the swingarm and tack on the cross brace. This is to ensure that the shock will not
bind in the hole in the swing arm.
* Now comes the really exciting part! Invert the frame, with everything still
attached (BTW - take the engine out first!!! :-) ) and locate the lower pivot for the
shock linkage. If your bike is like mine, I cut off the existing shock linkage pivots,
ground down the frame and used the centre stand pivot as the pivot location. I was
planning on removing the centre stand anyway.
 * Make sure that the location you pick won't cause the linkage hinge to bind on itself
at full lower extension (ie : no compression of the spring). I welded two tubes to the
existing pivot link linkage pivots and the welded one end of each to each side of the
centre stand pivot. I then have a 6.5" bolt running through the tube and the lower
link pivot. I'm sure this is a bit hard to visualise - hope the pictures below help.
This view shows the completed bell crank pivot from the front, welded to the old
centre stand bracket and lower frame cross tube :
* Make sure that the location you pick won't cause the linkage hinge to bind on itself
at full lower extension (ie : no compression of the spring). I welded two tubes to the
existing pivot link linkage pivots and the welded one end of each to each side of the
centre stand pivot. I then have a 6.5" bolt running through the tube and the lower
link pivot. I'm sure this is a bit hard to visualise - hope the pictures below help.
This view shows the completed bell crank pivot from the front, welded to the old
centre stand bracket and lower frame cross tube :
 This view depicts the semi-finished bell crank pivot from the rear, also showing the
side stand pivot relocated to the outside of the frame cross tube and the large threaded
rod running through the frame cross tube holding it all together for welding (and a
little more strength). The bolt ends were then cut off :
This view depicts the semi-finished bell crank pivot from the rear, also showing the
side stand pivot relocated to the outside of the frame cross tube and the large threaded
rod running through the frame cross tube holding it all together for welding (and a
little more strength). The bolt ends were then cut off :
 Finally, this provides a close up side view of the bell crank assembly and pivot :
 The picture below gives a view of the lower pivot mount and integrated splash guard
which was welded between the seat and frame rails - it was built from a sheet of steel
and hammered into it's curved form and then welded in.
The picture below gives a view of the lower pivot mount and integrated splash guard
which was welded between the seat and frame rails - it was built from a sheet of steel
and hammered into it's curved form and then welded in.
 Here's a view of the completed frame, with the swingarm and shock installed.

 It also shows the relocated (upwards) battery box (necessitated by the longer VFR shock)
- it's the same width as the stock one, but about 2' shallower. Here's the view from
the opposite side (taken somewhat earlier in the process, where I was also checking the
clearance of the carbs and filters):
It also shows the relocated (upwards) battery box (necessitated by the longer VFR shock)
- it's the same width as the stock one, but about 2' shallower. Here's the view from
the opposite side (taken somewhat earlier in the process, where I was also checking the
clearance of the carbs and filters):
 * As you can see, I have purchased a VFR rear wheel - 5.5" x 17, with a 180 x 55 tire.
I got a very good deal on a new one. The challenge is matching it, as the stock GSXR
wheels are 3 spoke and very different. The only option I have seen to date is a DYMAG
magnesium 5 spoke. Very nice & very expensive! DO NOT use an F2 or F3 wheel, as the
bearings are too weak. The stock VFR front wheel has no speedo drive, as they take it
off the countershaft on the VFR! I elected to go with a 3-spoke GSXR wheel. The discs
are so large (320 mm) that you can barely see the front wheel.
Side Stand :
* For the side stand, I ran a threaded rod through the bottom tube of the CBX frame
and then welded the broken off stub of the clamp (which had broken off the frame on the
day I was buying the bike!) onto the bottom of the frame and the bolted the whole thing
up - it's not going anywhere.
Here's a side view of the swingarm, side stiffening plates (which I made up from 5/8"
Aluminum plate), rear set(s) (purchased from M&P - made for the CBX) and modified side
stand, as well as the GSXR side panels, integrated with the stock CBX handles, modified
side covers and a Corbin seat :
* As you can see, I have purchased a VFR rear wheel - 5.5" x 17, with a 180 x 55 tire.
I got a very good deal on a new one. The challenge is matching it, as the stock GSXR
wheels are 3 spoke and very different. The only option I have seen to date is a DYMAG
magnesium 5 spoke. Very nice & very expensive! DO NOT use an F2 or F3 wheel, as the
bearings are too weak. The stock VFR front wheel has no speedo drive, as they take it
off the countershaft on the VFR! I elected to go with a 3-spoke GSXR wheel. The discs
are so large (320 mm) that you can barely see the front wheel.
Side Stand :
* For the side stand, I ran a threaded rod through the bottom tube of the CBX frame
and then welded the broken off stub of the clamp (which had broken off the frame on the
day I was buying the bike!) onto the bottom of the frame and the bolted the whole thing
up - it's not going anywhere.
Here's a side view of the swingarm, side stiffening plates (which I made up from 5/8"
Aluminum plate), rear set(s) (purchased from M&P - made for the CBX) and modified side
stand, as well as the GSXR side panels, integrated with the stock CBX handles, modified
side covers and a Corbin seat :
 The Aluminum side panels not only stiffen the frame in the area of the swingarm and
shock mount, but I think the look cool too!
This picture was taken at the end of 2000 - it gives a good view of the front end!
The Aluminum side panels not only stiffen the frame in the area of the swingarm and
shock mount, but I think the look cool too!
This picture was taken at the end of 2000 - it gives a good view of the front end!
 This picture was taken in the summer of 2001 - it shows the modified fairing mounts and
the FIAMM horns nestled (very tightly!) therein.
This picture was taken in the summer of 2001 - it shows the modified fairing mounts and
the FIAMM horns nestled (very tightly!) therein.
 Here are some views of the bike taken in October of 2001 --
it's almost done, except for the engine :
Here are some views of the bike taken in October of 2001 --
it's almost done, except for the engine :

 Other things I have done, but not covered here (each could be an article unto itself):
* Modified the stock gas tank to include an aircraft style filler cap (bought from M&P
in UK) and fuel gauge. The work involved in doing this is not for the faint of heart!
* Modified stock fairing - inserted a bikini fairing front. Modified the brackets and
fairing to accommodate a custom fabricated dashboard for extra gauges and relocating
the stock gauges off the triple tree. I have a huge number of hours invested in the
fairing, dashboard and bracketry.
Engine :
* Arias 1163 kit
* '79 cams, advancer and Danish Oldham couplers
* Modified intake and exhaust valves - cut down for increased valve area
* Ported and polished head
* K&N filtres and Stage III Dynojet kit
* Customised Kerker headers with handbuilt collector tubes,
bolting to Supertrapp SS canisters.
* Accel high voltage coils
* CBX Australia Alternator
* Custom (automotive) Aluminum oil cooler, with SS braided lines
This has been a 2.5-year journey to date - the first 6 months were very intensive,
working on it every moment I got. Ditto for the summer of 2000. 2001 was pretty
chaotic/busy on the job front, so I had less time. I hope to get the engine into
the frame in the next month or so (as I write this in April, 2002).
From a financial perspective, a project like this makes absolutely no sense at all.
It's an extension of me and I have changed virtually everything, so it's been expensive,
to say the least : about $ 21,000 Canadian invested, including the initial purchase.
The only things left to buy are a chain (need at least 112 links) and a battery.
Maybe you'll be able to see it at Marlinton, 2003!
Stephen
Other things I have done, but not covered here (each could be an article unto itself):
* Modified the stock gas tank to include an aircraft style filler cap (bought from M&P
in UK) and fuel gauge. The work involved in doing this is not for the faint of heart!
* Modified stock fairing - inserted a bikini fairing front. Modified the brackets and
fairing to accommodate a custom fabricated dashboard for extra gauges and relocating
the stock gauges off the triple tree. I have a huge number of hours invested in the
fairing, dashboard and bracketry.
Engine :
* Arias 1163 kit
* '79 cams, advancer and Danish Oldham couplers
* Modified intake and exhaust valves - cut down for increased valve area
* Ported and polished head
* K&N filtres and Stage III Dynojet kit
* Customised Kerker headers with handbuilt collector tubes,
bolting to Supertrapp SS canisters.
* Accel high voltage coils
* CBX Australia Alternator
* Custom (automotive) Aluminum oil cooler, with SS braided lines
This has been a 2.5-year journey to date - the first 6 months were very intensive,
working on it every moment I got. Ditto for the summer of 2000. 2001 was pretty
chaotic/busy on the job front, so I had less time. I hope to get the engine into
the frame in the next month or so (as I write this in April, 2002).
From a financial perspective, a project like this makes absolutely no sense at all.
It's an extension of me and I have changed virtually everything, so it's been expensive,
to say the least : about $ 21,000 Canadian invested, including the initial purchase.
The only things left to buy are a chain (need at least 112 links) and a battery.
Maybe you'll be able to see it at Marlinton, 2003!
Stephen